Cutter Hi-Lo Suction Snakebite Kit

Cutter Hi-Lo Suction Snakebite Kit

Cutter Hi-Lo Suction Snakebite Kit

I have always had a bit of a thing for kits; fishing kits, survival kits, first-aid kits you name it. My latest find is the "Cutter Hi-Lo Suction Snakebite Kit." Although incision and suction is no longer recommended first-aid this is still an ingenious piece of kit.

FOR REFERENCE ONLY THIS IS NOT RECOMMENDED FIRST-AID

Using the kit is very simple although it does sound a little archaic. If someone gets bitten clean the provided scalpel blade and wound with the antiseptic unit and make a ¼" incision over the bite. Apply one of the suction cups on the bite and squeeze. This creates a vacuum drawing blood and hopefully venom from the wound.  Then the lymph constrictor should be tied above the wound and the victim should get to the hospital immediately. It is called the Hi-Lo Suction Kit because different amounts of suction can be put onto the wound depending on which cup is used and how it is applied.

Cutter Hi-Lo Suction Snakebite Kit Un-packed

Cutter Hi-Lo Suction Snakebite Kit Un-packed

Beautiful and utilitarian, everything I love about good kit.

I felt it prudent to include the current first-aid for a snake bite. I was a little surprised to find that the stuff I learnt in Australia, pressure immobilization, is not the internationally recognized procedure.

Wikipedia recommends

Protect the person and others from further bites. While identifying the species is desirable in certain regions, risking further bites or delaying proper medical treatment by attempting to capture or kill the snake is not recommended.

Keep the person calm. Acute stress reaction increases blood flow and endangers the person. Panic is infectious and compromises judgment.

Call for help to arrange for transport to the nearest hospital emergency room, where antivenom for snakes common to the area will often be available.

Make sure to keep the bitten limb in a functional position and below the victim’s heart level so as to minimize blood returning to the heart and other organs of the body.

Do not give the person anything to eat or drink. This is especially important with consumable alcohol, a known vasodilator which will speed up the absorption of venom. Do not administer stimulants or pain medications to the victim, unless specifically directed to do so by a physician.

Remove any items or clothing which may constrict the bitten limb if it swells (rings, bracelets, watches, footwear, etc.)

Keep the person as still as possible.

Do not incise the bitten site.
— Wikipedia
Posted on March 31, 2012 and filed under Classic Kit.

New Hampshire Maple Syrup

Syrup Making

Syrup Making

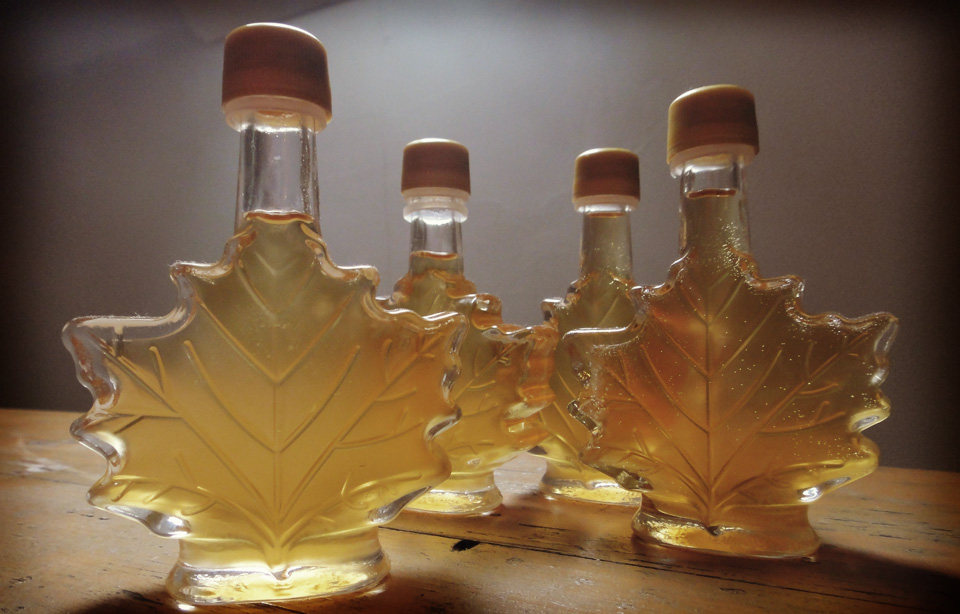
We did it, we made our own maple syrup! Myself and the Mrs we're invited to New Hampshire to spend a day (and a lot of a night) making syrup. We had a fantastic time. While I'm sure most serious syrup makers would frown upon some of the finer points of our process, we gathered sap and boiled and bottled our very own syrup.

Although very time consuming it was really easy. We helped gather 14 gallons (53 litres) of sap from some pre-tapped sugar maples. We then built a big fire and sat out all day with some local beers tending and topping up the reducing syrup. From our 14 gallons we ended up with just 1.8 pints (850ml.)

Collecting Sap

Collecting Sap

This was put into the token, sterilized, maple leaf shaped bottles and left to cool. An initial tasting was unlike any syrup I've ever had. It is often said the real deal is a million miles from the store bought stuff, and while we do buy local Maine syrup, this was indeed very different. Unmistakable as maple syrup but with a caramel taste to it as well. Lighter in colour and a little less brash, it is fantastic and will be treasured through-out the year.

VHD Syrup

VHD Syrup

Big thanks to the Nimmos in New Hampshire for showing us the ropes and letting us take more than our share of the finished product. I can't wait to do it again next year.

Posted on March 19, 2012 and filed under Recipe.

Cpt. Lawrence "Titus" Oates

Cpt. Lawrence Oates 17 March 1880 – 16 March 1912

Cpt. Lawrence Oates 17 March 1880 – 16 March 1912

Today marks 100 years since Cpt. Oates passed away, making the ultimate sacrifice to give his companions a better chance of survival. There are few stories as poignant and stirring as that of Cpt. Oates. I think it's important to give thought to this courageous man.

Portrait details. Captain Lawrence Edward Grace Oates during the British Antarctic Expedition of 1911-1913, ca 1911 Photographer: Herbert Ponting Reference Number: PA1-f-067-069-1 Silver gelatin print Photographic Archive, Alexander Turnbull Library

Posted on March 16, 2012 and filed under Hero.

W. K Merrill's 1962 Gear List

All About Camping 1962 - Drawing by Luis M. Henderson

All About Camping 1962 - Drawing by Luis M. Henderson

This list is from "All About Camping" written in 1962 by W.K Merrill a retired U.S Ranger. I have read books twice the size of this publication that contain a third as much information. His advice on "Knapsack Camping" is to "Take it easy–go light–keep a clean camp–prevent forest fires" something we should all be doing.

His gear list for an individual is as follows.

Air mattress, ¾ size, plastic or nylon for lightest type. Axe, small belt type (optional) Bag, sleeping, 3½-pounds eiderdown Bandanas, large (2) Belt and/or suspenders Boots, 8-inch tops, hobnailed or Tricouni nailed soles Camera and accessories (optional) Can opener, twist type for cutting smooth can edges Chap stick, white, for lip protection Compass, declinator, adjustable with sighting line Cook kit (one-man nesting type) Fire permit Firearms and ammunition if hunting First-aid kit, small size, plus mild laxative, roll of two-inch adhesive Flashlight, small fountain pen type, extra batteries and bulb Glasses, dark sun type or prescription ground, with case Handkerchief, white, pocket (1) Hat with wide brim or billed cap Head net for mosquito country Hunting and fishing licenses, if required Insect repellent Jacket, wool windbreaker Knapsack rucksack or pack-board Knife, with screwdriver, can opener, leather punch, and blade Map topographic, large scale of area Match safe, waterproof Matches, waterproofed Moccasins or tennis shoes to wear at camp or for emergency shoes Notebook and pencil Pants, blue jeans or poplin Poncho, groundcloth or tarpaulin (lightweight) Sewing kit (optional) Shaving kit (optional) Shirt lightweight wool, two if gone over a week Snake-bite kit Socks, two pair lightweight wool, two pair heavy wool, ½ size larger Sunburn lotion Tent lightweight (3½- pounds or 4-pounds) one or two man mountain style (optional) Toilet articles, toothbrush and paste, comb, soap, steel mirror Toilet paper Towels, one dish towel, one hand towel Underwear, two-piece long-handled type, lightweight wool Watch, wrist or pocket waterproof type
— W. K Merrill - All About Camping, 1962

A great, comprehensive list. I love that Merrill, being a U.S ranger, lists out both fire permits and hunting licenses.

Bannock

Cooking Bannock

Cooking Bannock

Living in a city (a small one none the less) I rarely get chance to have a fire and it just didn't feel right making my first bannock without one. Fortunately I was invited to New Hampshire to make maple syrup. This was the perfect excuse to try out my frying pan bread skills.

Bannock is an easy to make, no nonsense bread. Although it has Scottish roots it was also a favorite among native Americans as well as hikers, woodsmen and outdoors types. I came across a great number of recipes online and in various publications, they all have a similar base with other flourishes. The most detailed documentation was in Bradford Angier's "Home in Your Pack."

Angier's basic recipe and his method are as follows.

One cup flour
One teaspoon baking powder
One fourth teaspoon salt

Mix these dry ingredient if starting from scratch, taking all the time you need to do this thoroughly. Have the hands floured and everything ready to go before you add liquid. Make sure your frying pan is warm and greased.

Working quickly from now on, stir in enough water to make a firm dough. Shape this, with as little handling as possible, into a cake about an inch thick.

Lay the bannock in the warm frying pan. Hold it over the heat until the bottom crust forms, rotating the pan a little so the loaf will shift and not become stuck.

Once the dough has hardened enough to hold together, you can turn the bannock. This, if you’ve practiced a bit and have the confidence to flip strongly enough, can easily be accomplished with a slight swing of the arm and a snap of the wrist. Or you can use one of the plate from your cooking outfit, sliding the bannock onto this and reversing the frypan over the plate and turning both together.

When is the bannock done? After you’ve been cooking for them a while, you will be able to tap on one and gauge this by the hollowness of the sound. Meanwhile test by shoving in a clean straw or sliver. If any dough adheres, the loaf needs more heat. Cooking can be accomplished in about 15 minutes.
— Bradford Angier - Home in Your Pack, 1965

I made a double batch and also added: fresh blueberries, 3 tablespoons of butter and an extra pinch of baking powder. These are all Angier's recommendations for a tastier loaf.

Bannock Ready To Eat

Bannock Ready To Eat

I cooked exactly as advised and the results were fantastic. Crusty and toasted on the outside, fluffy in the middle with small blueberry explosions. Awesome with a little butter and some maple syrup. Looking forward to experimenting with different flavors. Cheese and olive spring to mind.

Posted on February 28, 2012 and filed under Recipe.

Tea Chronicles Pt. 5 – Nessmuk

Nessmuk

Nessmuk

Nessmuck was the pen name of George W. Sears, born in Massachusetts in 1821 he became recognised as a contributor to "Forest and Stream" magazine where he helped popularize canoeing, canoe camping and the use of ultralight single person canoes. Not a large man he kept his kit to the bare minimum advising his reader to "Go light; the lighter the better, so that you have the simplest material for health, comfort and enjoyment.” He was also one of America's first conservationists, he actively protested against the Pennsylvania's lumber companies for their destruction of the pine forests.

In 1881 Sears authored the indispensable "Woodcraft and Camping" and it is in here that we find about his respect for tea.

Often, when too utterly tiered and beaten for further travel, I have often tried coffee, whisky or brandy, and a long experience convinces me that there is nothing so restful and refreshing as green tea. To make it as it should be made, bring the water to a high boil, and let it continue to boil for a further minute. Set it off the fire and it will cease boiling; put in a handful of tea, and it will simmer for a few minutes, when it will be ready for use. Buy the best green tea you can find, and use it freely on a hard tramp. Black, or Oolong tea, is excellent in camp. It should be put in the pot with cold water and brought to the boiling point.
— Nessmuk - Woodcraft and Camping, 1881

There are some great sites about  Sears and "Woodcraft and Camping" is still in print and available on amazon. You can find masses of information about his life here including transcripts of his "Forest and Stream" letters and also an excellent more detailed biography here.

Posted on February 21, 2012 and filed under Tea.

Scattering Sir Hubert Wilkins’ ashes

Photo by Commander James F. Calvert from National Geographic

Photo by Commander James F. Calvert from National Geographic

On March 17th 1959, the USS Skate reached the North Pole. The American submarine broke through the pack ice into the arctic dusk. A storm was blowing as 2 dozen men gathered, by torchlight, and scattered the mortal remains of the legendary Australian explorer Sir George Hubert Wilkins. Commander James F. Calvert read the traditional Episcal for a burial at sea as a rifle squad fired three volleys and raised the Australian flag.

I first heard of this story many years ago when I read "Icemen", a history of arctic and antarctic exploration. The vivid imagery that this story conjured stuck firmly in my head and in the July 1959 issue of National Geographic Magazine, I found the photograph I'd been searching for since reading about this great Australian.

Wilkins, although little heard of compared to his contemporaries, was one of the most successful explorers to ever live. He saw more virgin land than anyone else in history; he was a polar explorer, ornithologist, pilot, soldier, geographer and photographer. A pioneer of aviation he was the first to pass over the North Pole in an aeroplane and to fly a plane the Antarctic. He was also the first to envision and to undertake a submarine journey under the Arctic ice.

Although he never completed his submarine journey to the floating pole, more than 20 years on Wilkins' widow passed on a copper urn to the crew of the USS Skate who would take the journey he envisioned and scatter his remains at the North Pole.

The Petzl Zoom

Petzl Zoom

Petzl Zoom

The first time I saw a Petzl ZOOM I was at Boy Scouts, doing a night hike with the scary looking Venture Scouts, the "Big kids." The ZOOM seemed to be the cool piece of gear at that time. People looked on with jealousy as they clutched their Dad's torches bought from  local hardware store, or their Mum's "power-out flashlight" from under the stairs. From then on I needed one. My brother, as ever, being older got his first but mine followed soon after.

Fernand Petzl

Fernand Petzl

The Petzl ZOOM was first introduced in 1981 and it changed things massively. It was designed by Fernand Petzl; a French caver, innovator and all around legend.

[Petzl] was designing and distributing solutions that aid in commitment and progression on vertical and/or dark terrain with optimal efficiency, freedom and safety.

Until the introduction of the ZOOM, head torches had been limited by their heavy battery packs and robust design. Because of this they were more suited to cavers and workers. What made the Petzl truly unique was its all-in-one construction. The battery pack sat on the back of the head and the torch component sat at the front. The original model used an incandescent bulb powered by a 4.5v flat battery.

What always struck me with Petzl gear was not only the innovative nature but also the quality. Their catalogues read more like mountaineering and caving manuals, each meticulously illustrated with details of the correct uses for each piece of kit. These are the kind of books that I would pore over as a child.

Each year Petzl would change the pattern on their headband, I always saw this as a nice touch - all your friends had the same model torch but they we're all different. It meant that something was being considered each year; this was an evolving product. I also liked that there was a small recess behind the flashlight section that housed a spare bulb. This became really useful when Halogen bulbs became more readily available; it meant that with a little fiddling you could have a high powered but short lasting focussed beam or a more conventional longer lasting softer beam. Their ongoing commitment to research, development and innovation has also lead Petzl to the forefront of LED head torches. They are now the standard for most hikers.

Even though my ZOOM is no more, it was one of the first legit serious pieces of hiking kit I ever bought and more than worthy of a place in hiking annals.

Posted on February 11, 2012 and filed under Classic Kit.