Posts tagged #recipe

Planked Fish

Brandt Berglund and Clare E. Bolsby - Wilderness Cookbook, 1976 

Brandt Berglund and Clare E. Bolsby - Wilderness Cookbook, 1976 

I first saw this recipe on an episode of River Cottage, it looked amazing but I think that Brandt Berglund and Clare E. Bolsby have trumped Mr. Fearnley-Wittingsall with this recipe from their 1976 publication - "Wilderness Cookbook."

Planked fish was often used on the trail by scouts and early settlers. The method is simple and needs little attention while cooking.

Split a log a little larger than the spread of the fish. Rub some bacon fat or bear grease on the plank and prop it up vertically in front of the camp fire. Clean the fish and remove the head and tail. Split the fish open and place it skin side down on the preheated log. Tack the fish down along the edges of the skin with wooden pegs.

Season the fish and smear some grease or bacon fat on it. Place the log vertically in front of the fire and let cook. Baste the fish from time to time; it makes the meat much juicier.

The fish should cook in about 20 minutes, depending on size. Check the fish occasionally. When the meat is flakey and tender, remove from the head before it breaks loose from the skin and falls into the fire.

To save the trouble of basting I usually peg three or four strips of bacon on top of the fish before placing the log in front of the fire.
— Brandt Berglund and Clare E. Bolsby - Wilderness Cookbook, 1976
Planked Salmon on the Fire

Planked Salmon on the Fire

When I tried this method of cooking, I did a whole side of salmon on an offcut of wood. I didn't have any wooden pegs so I used regular nails, and I was fresh out of bear grease so I used butter, a little olive oil and some herbs. I also put a cast iron pan beneath the plank to catch all the goodness that came out which I used to baste the fish and pour over the meat when finished. It took a little over 20 minutes, but it was a big piece of fish. 

Planked Salmon Finished and Ready to Serve

Planked Salmon Finished and Ready to Serve

The finished salmon fell away from the skin and was succulent and moist. Incredibly straight forward and extremely delicious.

Posted on September 16, 2014 and filed under Recipe.

Campfire Sausage Stew with Thyme Dumplings

Sausage Stew and Dumplings

Sausage Stew and Dumplings

Stew is one of my staple outdoor dishes; it's very hard to mess up and the results can be spectacular. This time however, I wanted to up the stew ante and nudge my culinary comfort zone a little further by taking on the mighty dumpling.

Ingredients

For the stew

  • 6 Really good sausages (I normally go for something herby and porky, preferably from a good butcher)
  • 2 Large white onions, roughly chopped
  • 2 Large carrots, sliced
  • 10 Small new potatoes, chopped in half
  • 1 Pint of stock (I used a couple of beef stock cubes)
  • 1 Can of cheap beer
  • 1 Bottle of expensive cider
  • Worchester sauce
  • Thyme
  • Oil for cooking (something with a high burning temperature, sunflower is fine)

For the dumplings

  • 1 Cup of self raising flour
  • 1 Egg
  • 50g Cold butter cubed
  • 1 Tbsp chopped parsley
  • 1 Tbsp chopped thyme
  • ¼ Cup of milk

Method

I cooked my stew on a campfire in a suspended Dutch oven, it needs to cook for several hours so make sure there are sufficient coals. I started with a big hot fire with slow burning wood and let it burn down. You can, of course vary the height of the oven and even cover it in coals if the heat is needed.

Sautéing and Grilling

Sautéing and Grilling

1. Lightly heat the Dutch oven and add the oil. Sauté the onions, do not let them brown - they should soften and go translucent.

2. While the onions were cooking, I put the sausages on a rack directly over the flames to seal and brown the outside. They don't need to cook through as this will happen later. I managed to tilt the grill in such a way that the oil and juices went into the Dutch oven for extra flavour.

3. Once the sausages are browned add them to the onions and pour in the stock, beer and cider. I added a good spoonful of thyme and a few good glugs of Worchester Sauce. Give it all a good stir and bring the oven to the boil, cover and simmer for 45 minutes.

4. By now the broth should be coming together nicely and slowly reducing. Add the vegetables and return the stew to the heat, give it a good stir and cover, then cook for another 30 minutes. Mix up the dumplings.

5. To make the dumplings, pour the flour into a large bowl, add the butter and rub it in until it resembles breadcrumbs.

6. Add the herbs and the egg, and mix with your hand, adding just enough milk so that the mixture comes together in a sticky dough.

7. Check the stew, it should have reduced considerably making a thick, rich gravy; if it is too dry add a little water or stock. Give it another stir and then add large spoonfuls of the dough directly onto the top of the stew. Try and place them a few centimeters apart as they will puff up as they cook. Replace the lid on and cook for another 15 minutes.

8. Check the stew. The dumplings should have puffed up and increased in size and the stew should be thick and rich. I prefer the top of my dumplings to be crispy so I buried the Dutch oven in coals and  blasted it for another five minutes.

9. Then it is done. Serve quickly and eat heartily.

Stew and Dumplings Finished and Ready to Serve

Stew and Dumplings Finished and Ready to Serve

The stew is hefty and flavorsome, the dumplings sticky, doughy and morish. Shared between two we were both stuffed and had enough for lunch the day after. I'm not sure why I was so fearful of campfire dumplings, they were foolproof and a simple way of getting a delicious and filling bread course to my stew, with little effort.

Posted on July 6, 2014 and filed under Recipe.

Homemade Beef Jerky

 William Kemsley, Jr. - The Whole Hiker's Handbook, 1979

 William Kemsley, Jr. - The Whole Hiker's Handbook, 1979

What could be finer for a Spring day hike than a Ziploc bag full of homemade beef jerky goodness?

There are no doubt more complicated and involved ways to make it and some of the jerky connoisseurs may frown upon this method, but it was super simple, delicious and was made without a dehydrator. I found the recipe in "The Whole Hikers Handbook - The Definitive Sourcebook Featuring The Best Of Backpacker Magazine" published in 1979 by William Kemsley, Jr.

Jerky Preperation

Jerky Preperation

Jerky is very popular, though I hardly ever take it. If I do, it is not the commercially prepared type. I like the homemade variety. Here’s a recipe for it.

Beef Jerky

1 ½ lbs. beef (flank or round)
1 tsp. seasoned salt
1 tsp. onion powder
½ tsp. garlic powder
¼ tsp. pepper
½ cupWorcestershire sauce
½ cup soy sauce
Remove all fat from meat. Cut into ¼” slices along the grain. It is easier to slice if partially frozen.

Combine dry and liquid ingredient to make marinade. Marinate meat overnight in refrigerator. Drain. Lay meat strips on over rack and place foil on bottom rack to catch drippings. Leave door ajar. Set oven at 150˚F. Dry meat for 6 hours. Turn oven off and leave meat in oven for another 6 hours.

Store Jerky in covered container with holes punched in lid. Makes one pound.
— William Kemsley, Jr. - The Whole Hiker's Handbook, 1979
Finished Jerky 

Finished Jerky 

As my first foray into the world of dried meat I can claim this as a success; it was meaty and tasted of beef, not teriyaki or cracked pepper, which I liked a lot. It was a little heavy on the sodium so some fine tuning will be in order, but I'll be making it again for sure - in time for some Summer hiking perhaps. If you give it a try I'd love to hear about your results or any alternative recipes you have. Happy Spring, FINALLY!

Campfire Curry

Campfire Curry

Campfire Curry

This is my second attempt at documenting my campfire cookery. The dish is a little ambitious but worth the effort as there is nothing better than curry made from scratch. This particular recipe is loosely based on Pat Chapman's pragmatically named, yet delicious – "Medium Curry, Restaurant Style"  from "The Indian Restaurant Cookbook," published in 1984. Chapman is, in my opinion, one of the leading authors of Indian cookbooks and a champion of the English restaurant style of curry.

Finished Curry

Finished Curry

Campfire Curry, Restaurant Style

The beauty of this dish is that all of the more complicated components can be made in advance; the spices can be mixed and a simple onion purée can be made at home before you head out to camp.

Onion Purée

Roughly chop 10 onions, 20 large garlic cloves and 100g of fresh ginger and lightly fry in 300ml of vegetable oil over a light heat. This should take about 15 minutes; they should turn translucent but not brown. Purée the fried mixture and let cool, then fry for another 15 minutes with another 300ml of vegetable oil. This will make 10 cups of purée, which can be frozen for future curries.

Ingredients

1.4 kg skinned chicken cut into 3cm cubes (not just breast, make sure to use some thighs for more flavor) 2 cups of onion purée, brought from home (see above) 2 tbsp. tomato purée

Spices 1, mix this at home 2 tsp. ground cumin 2 tsp. ground coriander 2 tsp. turmeric 2 tsp. chilli powder (or more depending on how hot you like it) 2 tsp. ground ginger 2 tsp. garlic powder

2 tsp. garam masala

Method

This is a baked curry so you will need a Dutch oven and a good bed of coals for a long slow cook. Build the fire big and hot and let it burn down to good cooking coals.

  1. Heat your Dutch oven to medium hot, add onion purée and fry until it is hot, add extra oil if you think it is sticking
  2. While the onion is frying mix a little water with spice mix 1 to make a paste
  3. Add this paste to the heated onions and give it a vigorous stir, making sure it doesn't stick, take it off the heat if it's getting too hot. Cook for a good five minutes - the goal is to remove all the water from the spices
  4. Add the chicken and the tomato and mix really well coating all the chicken
  5. Put on the Dutch oven lid and bake for 45 minutes at a medium heat (375°F, 190°C). I cannot help giving it a look every 15 minutes but if you feel you have the heat just right then leave it longer. This should be a dry-ish curry but if you feel it is going to burn add a little water.
  6. After 45 minutes add the garam masala and cook for another 10 minutes
  7. Serve with rice and flat breads.

The curry was spicy and rich, with tender chunks of chicken and enough sauce to mix with the rice. I've tried this dish at home with lamb, which was delicious, but the fire smoke and the outdoor surroundings certainly added new level of flavour to the curry.

The "The Indian Restaurant Cookbook" appears to be out of print now. It's not too hard to come by a second hand copy and is worth snapping up if you find it.

Posted on June 5, 2013 and filed under Recipe.

Damper

Damper

Damper

Damper is an iconic Australian bush bread - a staple for stockmen, swagmen, drovers and indigenous Australians alike. It is similar to bannock but is traditionally cooked directly on campfire coals or in a Dutch oven. The recipe is simply water and self raising flour, but everyone seems to have their own unique spin. The recipe I followed is from Viv Moon's incredible "Outdoor Cookbook"

Basic damper recipe

3 ⅓ cups self raising flour
Pinch of Salf
Beer (any kind)
Place flour into a mixing bowl and make a well in the centre

Add any other ingredients you wish to add. Mix in enough beer to form a soft pliable dough. This is usually more easily done with hands rather than spoons. If the mixture feels too moist, sprinkle over more flour. If too dry simple add more liquid.

Do not overwork the mixture as it will become tough

Roll into a ball shape that will fit into your camp oven. The camp oven can be lined with foil to protect the base, if desired.

Place in a moderate preheated camp oven and bake for at least 20 minutes before checking
— Viv Moon - Outdoor Cookbook
Mixing the Dough

Mixing the Dough

This was very simple and very tasty, I followed Viv's recipe to the note. I used a trivet in my oven just to lift the bread a little and get the heat circulating. As ever with a Dutch oven it took a while to get the really good coals ready but it can't be rushed. I preheated the oven and dropped the dough in, checking after 20 minutes - the bread had risen nicely and giving it a tap I got the tell-tale hollow sound. I added more coals and increased the heat to try and get a little more colour and gave it another ten minutes.

The Finished Product

The Finished Product

The results were great. It seemed to rise more than bannock but didn't quite get the colour of the skillet bread. Taste wise it was light, fluffy and delicious. We ate it with campfire chilli and had enough left for breakfast the next day. I will definitely be making this again.

Head to head against bannock I preferred damper; although it tasted similar it was a much lighter bread. It does however take longer to cook and requires a camp oven not just a frying pan or skillet.

If any body else has tried damper or has their own spin on it I'd love to hear about it.

Posted on July 4, 2012 and filed under Recipe.

New Hampshire Maple Syrup

Syrup Making

Syrup Making

We did it, we made our own maple syrup! Myself and the Mrs we're invited to New Hampshire to spend a day (and a lot of a night) making syrup. We had a fantastic time. While I'm sure most serious syrup makers would frown upon some of the finer points of our process, we gathered sap and boiled and bottled our very own syrup.

Although very time consuming it was really easy. We helped gather 14 gallons (53 litres) of sap from some pre-tapped sugar maples. We then built a big fire and sat out all day with some local beers tending and topping up the reducing syrup. From our 14 gallons we ended up with just 1.8 pints (850ml.)

Collecting Sap

Collecting Sap

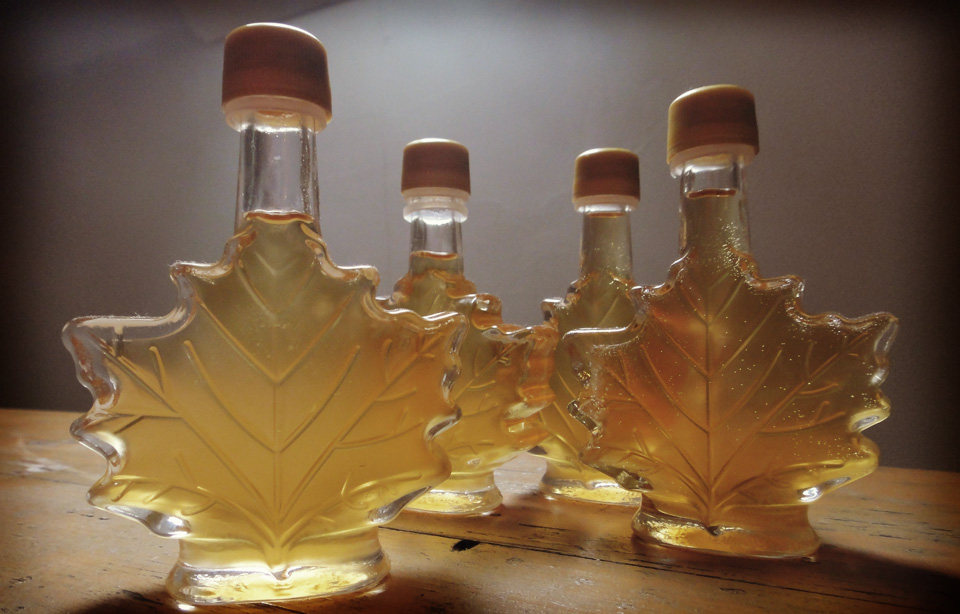
This was put into the token, sterilized, maple leaf shaped bottles and left to cool. An initial tasting was unlike any syrup I've ever had. It is often said the real deal is a million miles from the store bought stuff, and while we do buy local Maine syrup, this was indeed very different. Unmistakable as maple syrup but with a caramel taste to it as well. Lighter in colour and a little less brash, it is fantastic and will be treasured through-out the year.

VHD Syrup

VHD Syrup

Big thanks to the Nimmos in New Hampshire for showing us the ropes and letting us take more than our share of the finished product. I can't wait to do it again next year.

Posted on March 19, 2012 and filed under Recipe.

Bannock

Cooking Bannock

Cooking Bannock

Living in a city (a small one none the less) I rarely get chance to have a fire and it just didn't feel right making my first bannock without one. Fortunately I was invited to New Hampshire to make maple syrup. This was the perfect excuse to try out my frying pan bread skills.

Bannock is an easy to make, no nonsense bread. Although it has Scottish roots it was also a favorite among native Americans as well as hikers, woodsmen and outdoors types. I came across a great number of recipes online and in various publications, they all have a similar base with other flourishes. The most detailed documentation was in Bradford Angier's "Home in Your Pack."

Angier's basic recipe and his method are as follows.

One cup flour
One teaspoon baking powder
One fourth teaspoon salt

Mix these dry ingredient if starting from scratch, taking all the time you need to do this thoroughly. Have the hands floured and everything ready to go before you add liquid. Make sure your frying pan is warm and greased.

Working quickly from now on, stir in enough water to make a firm dough. Shape this, with as little handling as possible, into a cake about an inch thick.

Lay the bannock in the warm frying pan. Hold it over the heat until the bottom crust forms, rotating the pan a little so the loaf will shift and not become stuck.

Once the dough has hardened enough to hold together, you can turn the bannock. This, if you’ve practiced a bit and have the confidence to flip strongly enough, can easily be accomplished with a slight swing of the arm and a snap of the wrist. Or you can use one of the plate from your cooking outfit, sliding the bannock onto this and reversing the frypan over the plate and turning both together.

When is the bannock done? After you’ve been cooking for them a while, you will be able to tap on one and gauge this by the hollowness of the sound. Meanwhile test by shoving in a clean straw or sliver. If any dough adheres, the loaf needs more heat. Cooking can be accomplished in about 15 minutes.
— Bradford Angier - Home in Your Pack, 1965

I made a double batch and also added: fresh blueberries, 3 tablespoons of butter and an extra pinch of baking powder. These are all Angier's recommendations for a tastier loaf.

Bannock Ready To Eat

Bannock Ready To Eat

I cooked exactly as advised and the results were fantastic. Crusty and toasted on the outside, fluffy in the middle with small blueberry explosions. Awesome with a little butter and some maple syrup. Looking forward to experimenting with different flavors. Cheese and olive spring to mind.

Posted on February 28, 2012 and filed under Recipe.

Tea Chronicles Pt.4 - Colin Fletcher

Fletcher at camp

Fletcher at camp

This is a tea story I've been looking forward to posting but has taken a little preperation.

As a British ex-pat Colin Fletcher upheld the "Britanic Afternoon Tea" ritual despite having lived away from Blighty for more than a quarter of a century. In "The Complete Walker Pt. 3" Fletcher details his approach to tea and hiking.

A little to my surprise, I find plain, straightforward Lipton tea the best for sheer resuscitation power. Thirty bags see even me through the thirstiest week. I normally include a few fancier jobs, mint- or orange- or cinnamon flavored, for rest-day kicks.
— Colin Fletcher -The Complete Walkerm, 1984

Fletcher goes on, in his unique and entertaining way, to detail the use of both tea, coffee and cocoa. He quotes a paper by the Addictions Research Foundation of Ontario.This gives the hard line on the effects of caffeine. Fletcher however  jumps to the defence of tea calling coffee and cocoa "mere foods" and "such calumnies against tea are enough to depress the mood, if not the performance of an Un-British Activities Committee"

In weighing up the pluses and minuses of loose leaf vs. tea bags vs. tea powder he provides a recipe for a blend given to him by "a lover of tea and a hater of tea bags"

The blend is

3 parts Darjeeling
3 parts Keemun
1 part Ceylon
A dash of Lapsang Suchong

which, he avers can actually be smoked and “will cure all ills, including future smoking of anything. You carry such leaves in a Ziploc plastic bag and steep by means of a lightweight metal basket.
— Colin Fletcher -The Complete Walkerm, 1984

This I had to try, I sourced the various teas and the blend is complete. It's a delicious hearty black tea- a no-nonsense blend.  I am a big fan of Russian Caravan Tea and this is similar with Keemun and the dash of Lapsang Suchong but the Celyon gives it a lighter edge steering it a little closer to an English style tea.

A lover of tea and a hater of tea bags blend

A lover of tea and a hater of tea bags blend

I was so impressed I've made a full batch if anyone out there is interested in trying some shoot me an email and I'll figure the best way to get it out to you.

Posted on January 12, 2012 and filed under Tea.

Treeless Maple Syrup

Treeless Maple Syrup from Taming the Wilds

Treeless Maple Syrup from Taming the Wilds

After pack weight, trail food would have to be one of the most talked about hiking subjects. I am fascinated by the creative recipes written in older hiking books. The most interesting come from a time before commercial hiking food, when hikers managed with some fresh produce and dry staples, adding to their larder by hunting and gathering. Most recipes are fairly predictable rabbit stew, fish, beans and breads.

There is one recipe, however, that stuck in my head more than any other. Treeless Maple Syrup from Bradford Angier's 1967 publication "Taming the Wilds."

Finished Syrup

Finished Syrup

This recipe is for those living outside the North East who do not have access to maple trees.

6 medium potatoes 2 cups water 1 cup brown sugar 1 cup white sugar

Peel the potatoes. Boil uncovered with 2 cups of water until one cup of fluid remains. Remove the potatoes and use any way you want. Stirring the liquid until the boiling point has been once again reached, slowly add the sugar. Once this has entirely dissolved set the pan off the heat to cool slowly.
— Bradford Angier - Taming the Wilds, 1967

It can then be bottled.


Being a newcomer to New England, and not having had the chance to make my own maple syrup yet, I thought I would give it a try. I'd love to report it was incredible but as per Angier's instructions I am leaving it to mature. An initial tasting was accurate to Angier's prediction, realising my "worst fears" flavour wise. He advised placing it in a dark place for several days the results of which he promises will be surprising. I shall report back once ready.

UPDATE: Results are in.

Posted on November 13, 2011 and filed under Books, Recipe.